Core Location là gì?
Core Location là một framework của Apple, cung cấp các dịch vụ xác định vị trí địa lý, độ cao và hướng của thiết bị hoặc vị trí của thiết bị, từ đó có thể lấy được dữ liệu để làm việc với Google Map hay Apple Map. Framework này tập hợp dữ liệu bằng cách sử dụng tất cả các thành phần có sẵn trên thiết bị, bao gồm Wi-Fi, GPS, Bluetooth, ...
Một số tính năng nổi bật và hay sử dụng nhất:
-
Lấy được vị trí hiện tại của người dùng.
-
Tự động cập nhật vị trí mới nhất của người dùng.
-
Chạy được ở chế độ background.
-
Tự động cấu hình để chạy ở chế độ tiết kiệm pin khi phải thường xuyên cập nhật vị trí.
-
Cung cấp các modul để chuyển đổi từ địa chỉ sang toạ độ và người lại.
Bài viết sẽ tập trung giới thiệu các tính năng nổi bật này, bằng cách tạo một Manager Class để gom nhóm và dễ quản lý.
Cài đặt
Bài viết sử dụng Xcode 12.5 và Swift 5 có sử dụng RxSwift.
Tạo mới project (trong bài viết đặt tên là DemoApp). Sau đó tạo final class LocationManager.swift và tạo instance cho class này.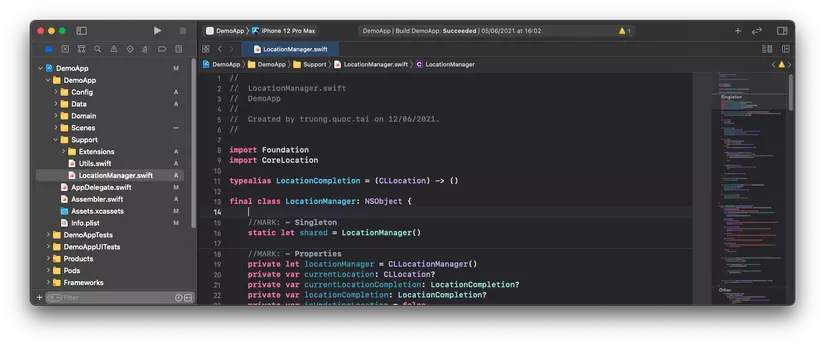
Config Location Manager
-
Khởi tạo
typealias LocationCompletion = (CLLocation) -> ()
-
Tạo các properties để sử dụng
//MARK: - Properties
    private let locationManager = CLLocationManager()
    private var currentLocation: CLLocation?
    private var currentLocationCompletion: LocationCompletion?
    private var locationCompletion: LocationCompletion?
    private var isUpdatingLocation = false
-
Tạo hàm configLocation() và gọi nó ở hàm init của class
    override init() {
        super.init()
        configLocation()
    }

    func configLocation() {
        locationManager.delegate = self
        locationManager.allowsBackgroundLocationUpdates = true
        locationManager.desiredAccuracy = kCLLocationAccuracyBest
        locationManager.distanceFilter = 10
    }
Lưu ý ở hàm configLocation:
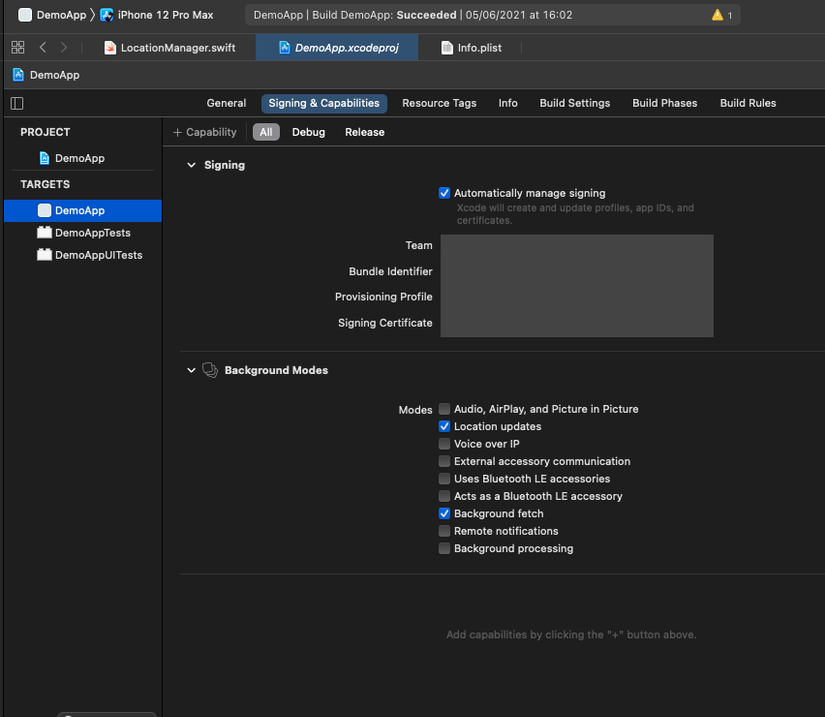
Để có thể sử dụng location ở chế độ background, bạn cần làm 2 việc:
-
Đầu tiên bạn cần set
locationManager.allowsBackgroundLocationUpdates = true.
-
Tiếp theo bạn tick chọn vào
Location updates và Background fetch ở phần Tagets (hình hướng dẫn ở ngay dưới).
-
Nếu bạn không tìm thấy Background Modes:
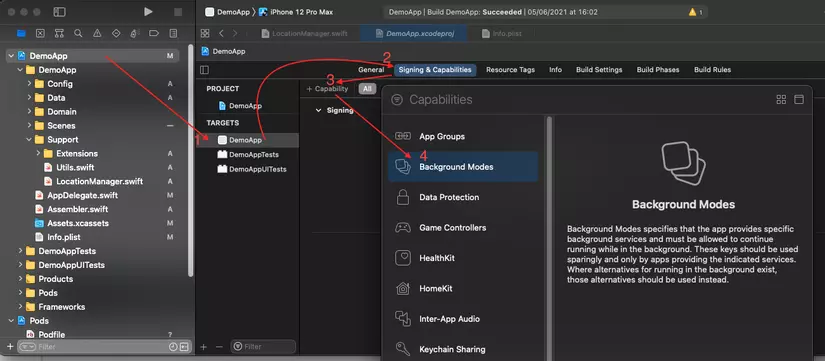
-
Handle các function của CLLocationManagerDelegate
Hàm didUpdateLocations sẽ dùng để update lại các properties đã khai báo ở phần trên.
extension LocationManager: CLLocationManagerDelegate {
    func locationManager(_ manager: CLLocationManager, didChangeAuthorization status: CLAuthorizationStatus) {
        switch status {
        case .authorizedAlways:
            print("user allow app to get location data when app is active or in background")
            manager.requestLocation()

        case .authorizedWhenInUse:
            print("user allow app to get location data only when app is active")
            manager.requestLocation()

        case .denied:
            print("user tap 'disallow' on the permission dialog, cant get location data")

        case .restricted:
            print("parental control setting disallow location data")

        case .notDetermined:
            print("the location permission dialog haven't shown before, user haven't tap allow/disallow")

        default:
            print("default")
        }
    }

    func locationManager(_ manager: CLLocationManager, didUpdateLocations locations: [CLLocation]) {
        if let location = locations.first {
            self.currentLocation = location

            if let currentCompletion = currentLocationCompletion {
                currentCompletion(location)
            }

            if isUpdatingLocation, let updating = locationCompletion {
                updating(location)
            }
        }
    }

    func locationManager(_ manager: CLLocationManager, didFailWithError error: Error) {
        print("Error: \(error.localizedDescription)")
    }
}
Như vậy là phần config cơ bản đã xong 😃
Request Location Permission
Đầu tiên, muốn sử dụng location trên ứng dụng của bạn thì phải được người dùng cho phép. Để xin quyền người dùng, bạn thêm 2 key sau vào file Info.plist Nói một chút về 2 key này:
-
Privacy – Location When In Use Usage Description: Chỉ lấy location khi dùng app và sử dụng cho hàm requestWhenInUseAuthorization()
-
Privacy – Location Always and When In Use Usage Description: Luôn luôn lấy location và cho phép chạy nền và sử dụng cho hàm requestAlwaysAuthorization()
Tiếp theo, chúng ta thêm hàm getAuthorizationStatus() và request() vào LocationManager.swift
func getAuthorizationStatus() -> CLAuthorizationStatus {
        if #available(iOS 14.0, *) {
            return locationManager.authorizationStatus
        } else {
            return CLLocationManager.authorizationStatus()
        }
    }

func request() {
        let status = getAuthorizationStatus()

        if status == .denied || status == .restricted || !CLLocationManager.locationServicesEnabled() {
            return
        }

        if status == .notDetermined {
            locationManager.requestWhenInUseAuthorization()
            return
        }

        locationManager.requestLocation()
    }
Và cuối cùng, gọi nó AppDelegate hoặc bất kì đâu chúng ta muốn bằng cách
LocationManager.shared.request()
Build app để tận hưởng nào, khi khởi chạy lần đầu tiên mà ứng dụng hiển thị như hình dưới thì chúc mừng bạn đã thành công 😎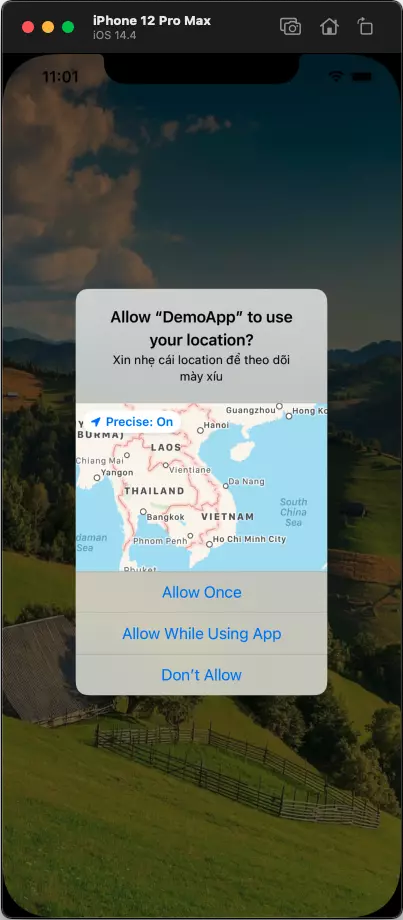
Không có gì đặc biệt nếu người dùng cho phép ứng dụng lấy vị trí hiện tại. Tuy nhiên nếu người dùng nhấn vào "Don't Allow" thì bạn phải làm sao? Trường hợp này bạn không thể gọi lại hàm request liên tục được vì:
Apple sẽ reject ứng dụng của bạn nếu bạn cố tình bắt người dùng phải cấp quyền.
Chúng ta cùng qua phần tiếp theo để xem chúng ta nên xử lý như thế nào với trường hợp này nha.
Lấy vị trí hiện tại của người dùng
Bạn để ý trong LocationManager.swift chúng ta có biến currentLocation: CLLocation? và biến này sẽ được cập nhật mỗi khi location thay đổi qua hàm locationManager(_ manager: CLLocationManager, didUpdateLocations locations: [CLLocation]) . Vì vậy để lấy vị trí hiện tại, bạn chỉ cầ thêm đoạn code sau vào LocationManager.swift và lúc nào bạn cần lấy vị trí hiện tại thì bạn gọi: LocationManager.shared.getCurrentLocation()
func getCurrentLocation() -> CLLocation? {
        let status = getAuthorizationStatus()
        if status == .denied || status == .restricted || status == .notDetermined || !CLLocationManager.locationServicesEnabled() {
            showAlertGotoSettings()
            return nil
        }
        return currentLocation
    }
Hàm này có đoạn code kiểm tra xem ứng dụng có được cấp quyền hay chưa, nếu chưa thì sẽ gọi hàm showAlertGotoSettings(). Đến đây bạn đã biết phải làm gì nếu người dùng không cấp quyền rồi đấy 😀
Đơn giản là nếu người dùng không cấp quyền thì bạn show lên alert thông báo ứng dụng cần quyền lấy vị trí thì mới thực hiện được tác vụ, sau đó mở setting của máy, trỏ thẳng tới ứng dụng của bạn và chờ đợi người dùng cấp quyền thôi. Đoạn code để hiện alert thông báo:
func showAlertGotoSettings() {
        let keyWindow = UIApplication.shared.connectedScenes
            .filter({$0.activationState == .foregroundActive})
            .map({$0 as? UIWindowScene})
            .compactMap({$0})
            .first?.windows
            .filter({$0.isKeyWindow}).first

        if var topController = keyWindow?.rootViewController {
            while let presentedViewController = topController.presentedViewController {
                topController = presentedViewController
            }
            let message = "Ứng dụng không có quyền sử dụng định vị.\nVui lòng cấp quyền cho ứng dụng ở cài đặt để có thể sử dụng."
            let alertController = UIAlertController (title: "", message: message, preferredStyle: .alert)
            let settingsAction = UIAlertAction(title: "Đi tới cài đặt", style: .default) { (_) -> Void in

                guard let settingsUrl = URL(string: UIApplication.openSettingsURLString) else {
                    return
                }

                if UIApplication.shared.canOpenURL(settingsUrl) {
                    UIApplication.shared.open(settingsUrl, completionHandler: { (success) in
                        print("Settings opened: \(success)") // Prints true
                    })
                }
            }
            alertController.addAction(settingsAction)
            let cancelAction = UIAlertAction(title: "Cancel", style: .default, handler: nil)
            alertController.addAction(cancelAction)

            topController.present(alertController, animated: true, completion: nil)
        }
    }
Quay lại với việc lấy vị trí hiện tại. Đầu tiên bạn tạo UI tuỳ theo ý định của bạn, ở đây mình tạo một UI mẫu để sử dụng cho nguyên bài viết của mình, giao diện như hình dưới: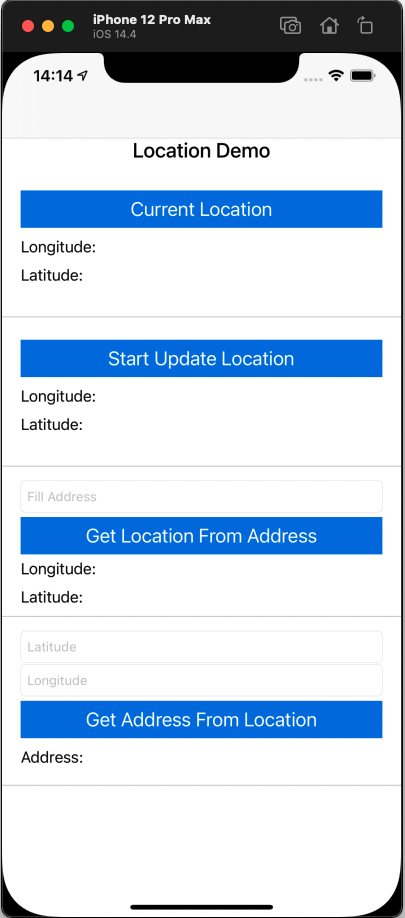 Khi bạn bấm vào button Current Location thì phần Longitude và Latitude sẽ hiển thị lên vị trí hiện tại của bạn, Đoạn code được miêu tả như dưới:
btnCurrentLocation.rx.tap
            .asDriverOnErrorJustComplete()
            .drive(onNext: { [weak self] in
                if let currentLocation = LocationManager.shared.getCurrentLocation() {
                    self?.lblLongitude.text = "\(currentLocation.coordinate.longitude)"
                    self?.lblLatitude.text = "\(currentLocation.coordinate.latitude)"
                }
            })
            .disposed(by: disposeBag)
Tuy nhiên mình cần lưu ý với bạn rằng hiện tại ứng dụng của bạn chỉ lấy location một lần duy nhất lúc khởi động app và không thực hiện quá trình cập nhật Location kể cả bạn thay đổi vị trí thì ứng dụng cũng chỉ lấy location đầu tiên.
Chúng ta cùng qua phần tiếp theo để biết được cách cập nhật được vị trí mới nhất của người dùng.
Cập nhật vị trí hiện tại của người dùng
Đầu tiên bạn thêm 2 hàm sau vào file LocationManager.swift
func startUpdatingLocation(completion: @escaping LocationCompletion) {
        locationCompletion = completion
        isUpdatingLocation = true
        locationManager.startUpdatingLocation()
    }

    func stopUpdatingLocation() {
        isUpdatingLocation = false
        locationManager.stopUpdatingLocation()
    }
Nhìn tên 2 hàm thì bạn cũng biết được mục đích của nó là gì rồi đúng ko 😀
Bạn gọi hàm startUpdatingLocation ở những nơi bạn cần lấy vị trí mới nhất, khi người dùng thay đổi vị trí thì vị trí sẽ được trả về thông qua completion.
Nếu ứng dụng của bạn không còn nhu cầu cập nhật Location nữa thì bạn gọi hàm stopUpdatingLocation để ngưng nhận các vị trí mới.
Điện thoại của bạn sẽ tốn pin hơn nếu bạn lấy vị trí liên tục như trên. Vì vậy mình khuyến khích gọi hàm stopUpdatingLocation ngay khi bạn không còn sử dụng.
Đoạn code mà mình gọi 2 hàm ở trên:
btnUpdateLocation.tag = 1
btnUpdateLocation.rx.tap
            .asDriverOnErrorJustComplete()
            .drive(onNext:{[weak self] in
                guard let self = self else { return }
                let status = LocationManager.shared.getAuthorizationStatus()
                if status == .denied || status == .restricted || status == .notDetermined || !CLLocationManager.locationServicesEnabled() {
                    LocationManager.shared.showAlertGotoSettings()
                    return
                }

                if self.btnUpdateLocation.tag == 1 {
                    self.btnUpdateLocation.tag = 2
                    self.btnUpdateLocation.setTitle("Stop Update Location", for: .normal)
                    LocationManager.shared.startUpdatingLocation { (location) in
                        self.lblUpdateLongitude.text = "\(location.coordinate.longitude)"
                        self.lblUpdateLatitude.text = "\(location.coordinate.latitude)"
                    }
                } else {
                    self.btnUpdateLocation.tag = 1
                    self.btnUpdateLocation.setTitle("Start Update Location", for: .normal)
                    LocationManager.shared.stopUpdatingLocation()
                }

            })
            .disposed(by: disposeBag)
Với đoạn code này thì khi bạn bấm vào button Start Update Location lần đầu tiên, thì sẽ gọi hàm startUpdatingLocation(), Khi có bất kì sự thay đổi nào về vị trí của người dùng, hàm sẽ trả về callback vị trí mới nhất lên, sau đó hiển thị Longitude và Latitude lên 2 label. Bấm vào button lần thứ 2 thì sẽ dừng quá trình cập nhật location.
Một vài cách để thay đổi location hiện tại trên simulator: Thay đổi bằng simulator: 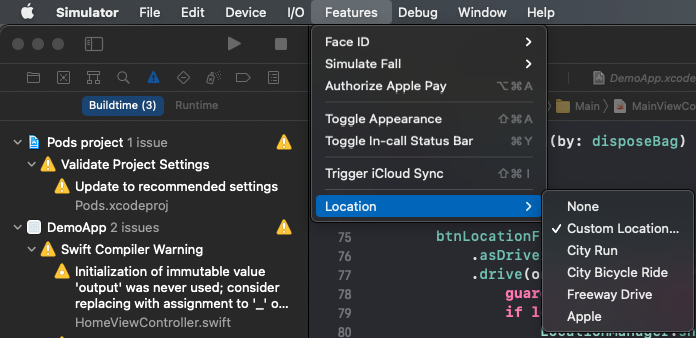
Thay đổi bằng Xcode: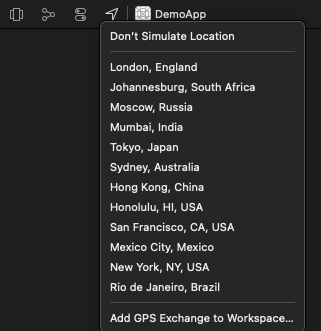
CLGeocoder
CLGeocoder là một class nằm trong Core Location framework phục vụ cho việc chuyển đổi qua lại giữa vị trí địa lý và địa chỉ.
Một vài lưu ý nhỏ khi sử dụng tới class này:
-
Việc gửi nhiều yêu cầu chuyển đổi trong một thời gian ngắn sẽ làm cho một số yêu cầu bị lỗi. Vì vậy bạn nên gửi duy nhất một yêu cầu chuyển đổi và đợi completion trả về trước khi gửi yêu cầu tiếp theo.
-
Nếu người dùng thực hiện nhiều hành động liên quan đến chuyển đổi vị trí địa lý cùng một vị trí, hãy sử dụng lại kết quả từ yêu cầu mã hóa địa lý ban đầu thay vì gửi một yêu cầu mới.
-
Khi bạn muốn tự động cập nhật vị trí hiện tại của người dùng (chẳng hạn như khi người dùng đang di chuyển), hãy chỉ đưa ra các yêu cầu chuyển đổi vị trí địa lý mới khi người dùng đã di chuyển một khoảng cách đáng kể và sau một khoảng thời gian hợp lý. Ví dụ: trong một tình huống điển hình, bạn không nên gửi nhiều hơn một yêu cầu mã hóa địa lý mỗi phút.
-
Không nên gửi yêu cầu chuyển đổi vị trí địa lý vào thời điểm mà người dùng sẽ không thấy kết quả ngay lập tức. Ví dụ: không bắt đầu một yêu cầu nếu ứng dụng của bạn không hoạt động hoặc ở chế độ nền.
Mình sẽ hướng dẫn cách chuyển đổi qua lại giữa vị trí địa lý và địa chỉ. Đầu tiên để kiểm tra tính đúng đắn, mở Maps lên, search một địa chỉ và xem kinh độ, vĩ độ của địa điểm đó. Ở đây mình chọn 467 Điện Biên Phủ, Phường 25, Quận Bình Thạnh địa chỉ này có vĩ độ và kinh độ tương ứng là 10.801794071424885 và 106.71379045103502. 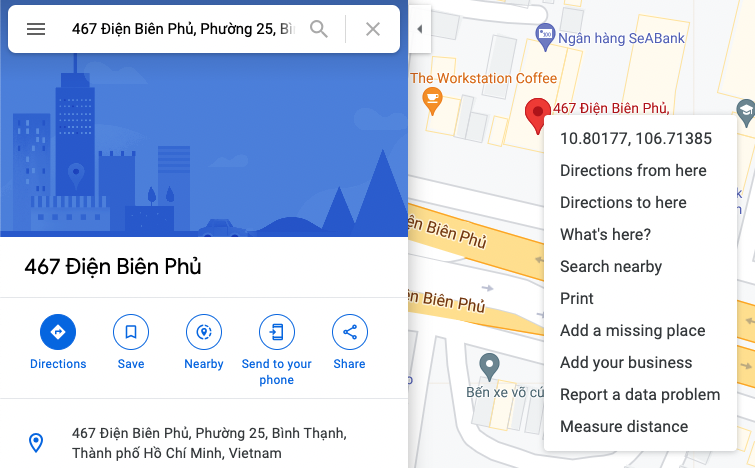
Chuyển đổi từ địa chỉ sang vị trí địa lý Thêm đoạn code sau vào file LocationManager.swift
func getLocation(from address: String, completion: @escaping (_ location: CLLocationCoordinate2D?)-> Void) {
        let geocoder = CLGeocoder()
        geocoder.geocodeAddressString(address) { (placemarks, error) in
            guard let placemarks = placemarks,
                  let location = placemarks.first?.location?.coordinate else {
                completion(nil)
                return
            }
            completion(location)
        }
    }
Đoạn code sử dụng:
btnLocationFromAddress.rx.tap
            .asDriverOnErrorJustComplete()
            .debounce(.milliseconds(500))
            .drive(onNext: {[weak self] in
                guard let self = self else { return }
                if let address = self.txtAddress.text, !address.isEmpty {
                    LocationManager.shared.getLocation(from: address) { [weak self](location) in
                        guard let self = self else { return }
                        if let location  = location {
                            self.lblLongitudeLFA.text = "\(location.longitude)"
                            self.lblLatitudeLFA.text = "\(location.latitude)"
                        } else {
                            self.lblLongitudeLFA.text = ""
                            self.lblLatitudeLFA.text = ""
                            self.showError(message: "Địa chỉ bạn nhập vào không đúng!")
                        }
                    }
                } else {
                    self.showError(message: "Địa chỉ bạn nhập vào không đúng!")
                }
            })
            .disposed(by: disposeBag)
Kết quả test: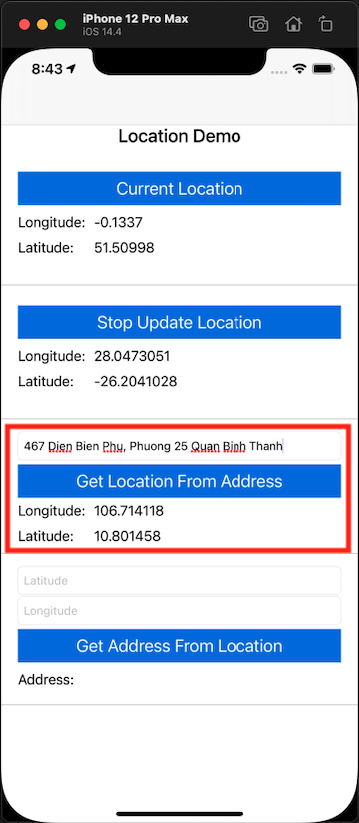
Chuyển đổi từ vị trí địa lý sang địa chỉ
Thêm đoạn code sau vào file LocationManager.swift
func getAddressFromLocation(latitude: Double, longitude: Double, completion: @escaping((String?, Error?) -> Void)) {
        var center = CLLocationCoordinate2D()

        let geocoder = CLGeocoder()
        center.latitude = latitude
        center.longitude = longitude

        let loc = CLLocation(latitude:center.latitude, longitude: center.longitude)


        geocoder.reverseGeocodeLocation(loc, completionHandler: {(placemarks, error) in
            if (error != nil) {
                completion(nil, error)
            } else if let pm = placemarks, pm.count > 0 {
                let pm = placemarks![0]

                var addressString = ""
                if pm.subThoroughfare != nil {
                    addressString = addressString + pm.subThoroughfare! + " "
                }

                if pm.thoroughfare != nil {
                    addressString = addressString + pm.thoroughfare! + ", "
                }

                if pm.subLocality != nil {
                    addressString = addressString + pm.subLocality! + ", "
                }

                if pm.subAdministrativeArea != nil {
                    addressString = addressString + pm.subAdministrativeArea! + ", "
                }

                if pm.locality != nil {
                    addressString = addressString + pm.locality! + ", "
                }

                if pm.country != nil {
                    addressString = addressString + pm.country! + ", "
                }

                if pm.postalCode != nil {
                    addressString = addressString + pm.postalCode! + " "
                }
                completion(addressString, nil)
            }
        })
    }
Đoạn code sử dụng:
btnAddressFromLocation.rx.tap
            .asDriverOnErrorJustComplete()
            .debounce(.milliseconds(500))
            .drive(onNext: {[weak self] in
                guard let self = self else { return }
                if let lat = Double(self.txtLatitude.text ?? ""),
                   let long = Double(self.txtLongitude.text ?? "") {
                    LocationManager.shared.getAddressFromLocation(latitude: lat, longitude: long) { (address, error) in
                        if error != nil {
                            self.showError(message: error?.localizedDescription ?? "")
                        } else if let address = address {
                            self.lblAddress.text = address
                        }
                    }
                } else {
                    self.showError(message: "Vị trí bạn nhập vào không đúng!")
                }
            })
            .disposed(by: disposeBag)
Kết quả test: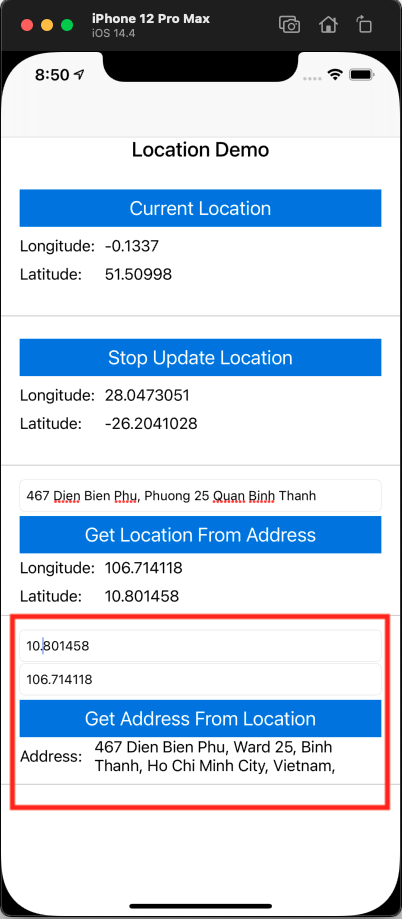
Kết!!
Qua bài viết trên, hi vọng bạn đã nắm được những thứ cơ bản và cách dùng Core Location trong swift, việc config như thế nào là tuỳ vào yêu cầu project của bạn. Chúc bạn thành công 🥰